Turntable Basics - Cartridge Alignment Tools
Phono Cartridge Alignment Tool for 12 inch records. $20
|
12 Inch Alignment Tool - Baerwald GeometryAcoustic Research, Empire, Garrard, Luxman, Music Hall, Sota, Systemdek, Thorens, VPI, Well Tempered turntables require oversized spindle hole - all others should use standardShopping Cart Supports Paypal, Visa, MasterCard, and American Express |
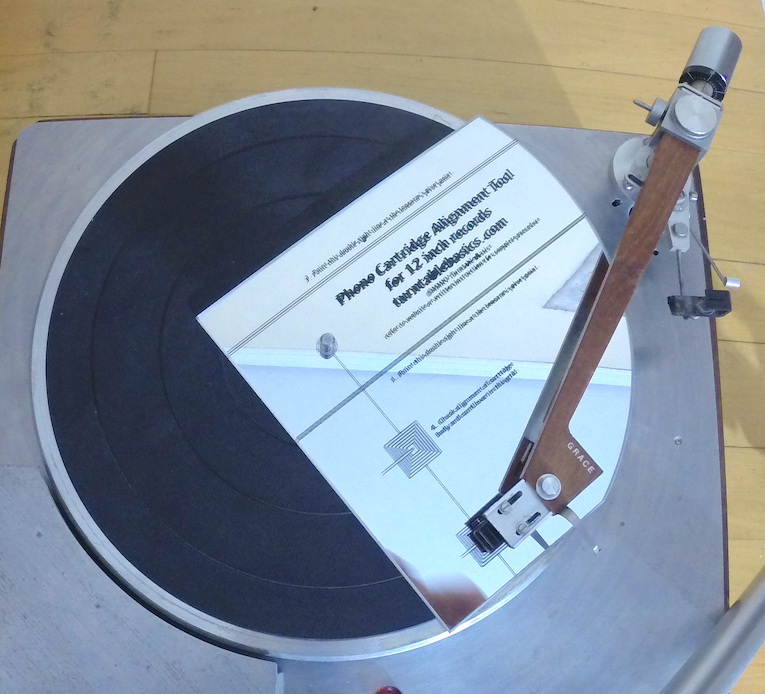
Turntable Basics has made the best cartridge alignment tool possible.
An essential tool for installing any phono cartridge. Obtaining correct overhang length and alignment is essential to obtaining proper audio reproduction, and avoiding unnecessary record and stylus damage.
This is a precision job and cannot be done by eye alone.
Based on long-accepted alignment geometry, but superbly executed, this alignment tool has a combination of features not available anywhere else. It is also the easiest to use.
The mirrored surface makes all measurements easier and more accurate. The mirror's parallax effect allows the elimination of sighting errors, and provides better lighting, critical in making fine adjustments on small parts. The two null points on the alignment tool are surrounded by concentric squares instead of a grid, so that the user will be measuring the cartridge body's lineup against parallel lines at each edge.
Finally, the horizontal sight-line, which is to be pointed at the pivot point of the tonearm when measuring alignment in the outer grid, ensures correct overhang length on any tonearm, irrespective of its effective length. Thereis an inverse relationship between the effective length of the tonearm and the optimal offset angle of the headshell.
Regardless of tonearm effective length, the two null points at which the stylus should be perfectly tangent to the groove, are the same. They are optimized for 12 inch records. A properly designed and mounted tonearm will allow the cartridge to line up properly in both grids. For more information on the relationship between effective length, mounting distance and offset angle, click here.
Complete instructions are included. They cover:
levelling the turntable
adjusting vertical tracking angle
calibrating and adjusting the tracking weight
setting overhang length
adjusting the tracking angle
checking and adjusting azimuth
Because some turntable models (i. e. Acoustic Research, Empire, Garrard, Luxman, Music Hall, Sota, Systemdek, Thorens, VPI, Well Tempered) have larger spindles, this alignment tool is available with either a standard or oversized spindle hole. All other brands of turntable will take the standard spindle hole.
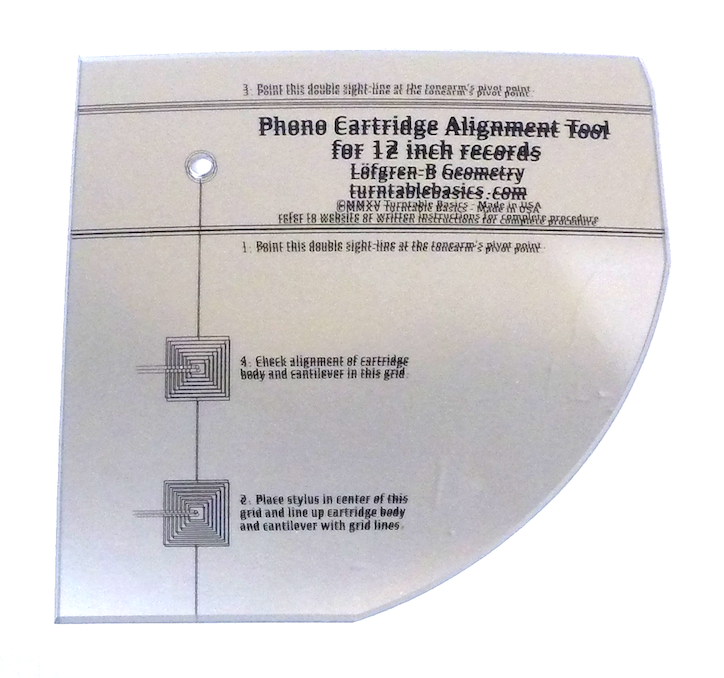
Phono Cartridge Alignment Tool for 12 inch records - Lofgren-B Geometry. $20
This alignment tool uses an alternative geometrical model proposed by Erik Lofgren in 1938. Compared with the Baerwald-based alignment tools featured above, Lofgren-B produces a lower average angular error across the width of the playing band, but at the cost of greater errors at the beginning and ending of the band.
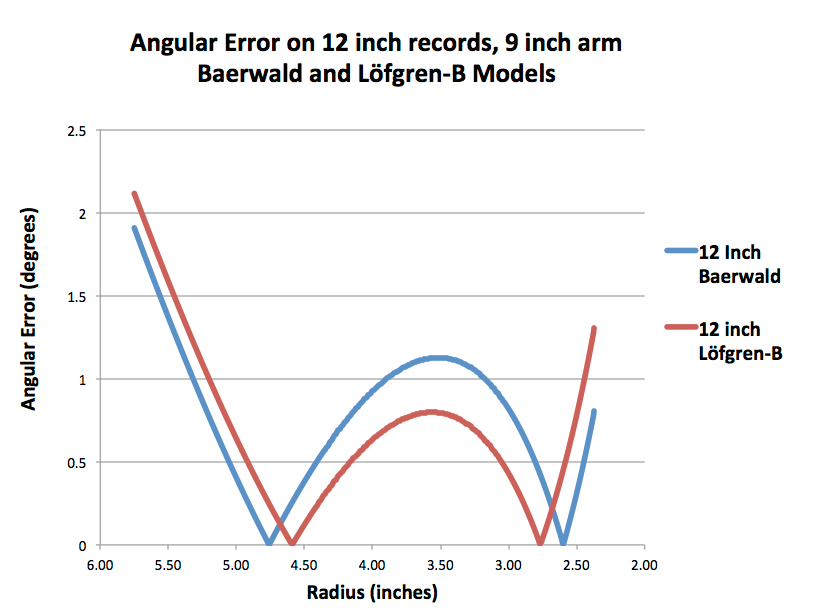
The Lofgren-B alignment equations, a very popular alternative to the Baerwald model, prescribe a slightly different effective length for any given mounting distance. The null points on the alignment tool are at distances of 2.77 inches and 4.60 inches from the spindle center. These are closer to the middle of the playing band than the Baerwald model's distances of 2.60 and 4.76 inches. These two alignment geometry models assume the same measurements of the beginning and end of the playing band, but use slightly different equations. Both models prescribe the same Offset Angle at any given effective length. The angular errors which result from aligning the cartridge by Lofgren-B will be smaller in the middle portion of the playing band, by comparison with the angular errors produced by the Baerwald model, but at the cost of greater errors at the beginning and end of the playing band. However, the average angular error is slightly smaller with Lofgren-B than with Baerwald. See the chart below for more detail.
Both systems have their adherents in the audiophile community. I do not take sides in this debate but I use Baerwald alignment setup on my own turntable because the maximum error anywhere on the playing band is lower with Baerwald. Instead, we serve both communities. If a 9 inch tonearm were aligned according to the Baerwald model and you wanted to switch it to the Lofgren-B setup, the mounting distance would remain the same at 8.2845 inches. However the effective length would change from 9.0 inches to 9.0187, or from 228.60 mm to 229.07 mm. In other words, you'd have to slide the cartridge further away from the pivot point of the tonearm (forward in the headshell) by a distance of 0.4407 millimeters, and twist the cartridge slightly to the inside, to change the offset angle by 0.053 degrees. You wouldn't have to take any of these measurements to do the alignment, of course. You just point the sight-lines at the pivot point of the tonearm, land the stylus in the center of the grid, sight the cantilever along the runway of the alignment grid, and then square up the cartridge body with the grid lines.
 | 12 Inch Alignment Tool - Lofgren-B GeometryShopping Cart Supports Paypal, Visa, MasterCard, and American Express |
Phono Cartridge Alignment Tool for 7 inch records. $20
There are four versions of this alignment tool. All utilize the same alignment geometry, and will produce the same result. However they are made to fit different turntables. The 12 inch platter version will hang over the edge of a 7 inch platter far enough to interfere with the tonearm base, so for purpose-built 45 players with smaller platters, the 7 inch platter version is required. If your player has a permanent 1-1/2 inch spindle, then you'll want the version with the 1-1/2 inch spindle hole. It can also be used on standard platters with a 45 RPM adapter. However, for turntables with 12 inch platters, the sight-lines on the 7 inch platter versions of the alignment tool won't come as close to the edge of the platter as the 12 inch platter version, and sighting the pivot point of the tonearm will be difficult.
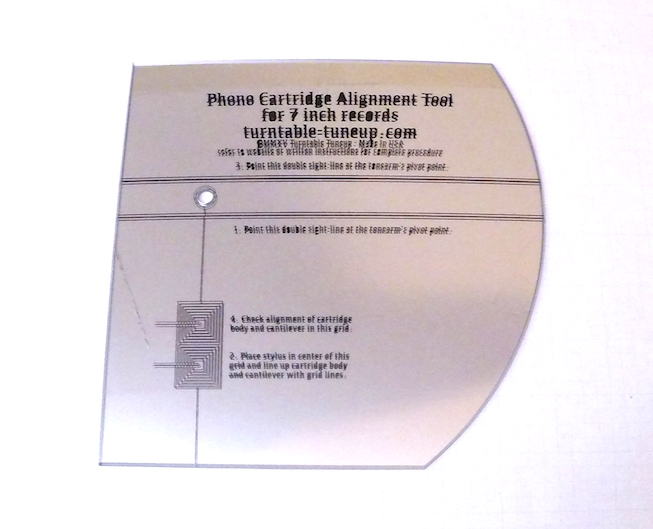 |
Cartridge Alignment Tool for 7 Inch Records on 12 inch platters - Baerwald Geometry
|
 |
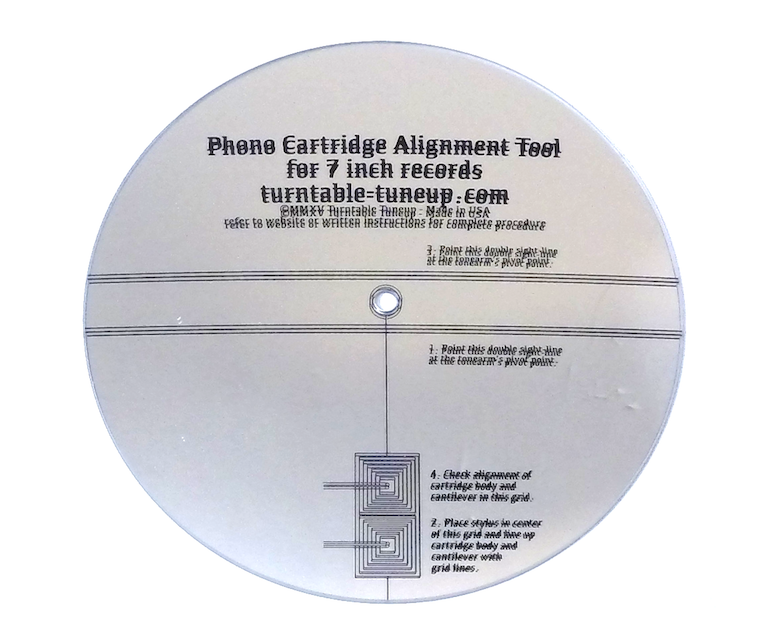
Cartridge Alignment Tool for 7 Inch Records on 7 Inch Platters - Baerwald GeometryShopping Cart Supports Paypal, Visa, MasterCard, and American Express |
 |
This is a phono cartridge alignment tool for 7 inch records. For collectors of 45 RPM singles, this is a must-have item.
By customizing your setup for the narrow playing band of a 7-inch records, you can reduce the average angular error between the stylus tip and the record groove by a factor of more than 6 to 1, and the maximum error by a factor of almost 9 to 1.
Alignment geometry is determined by the size of the record, specifically, the radii of the beginning and ending of the playing band. The narrower the playing band, the more accurate the alignment will be.
Using a 7 inch alignment tool to set up your turntable for 7 inch records will bring a dramatic improvement in the tracking quality and accuracy of playback from your 45 RPM collection. Aligning the cartridge for 7 inch records on a 9-inch tonearm will reduce the average angular error from .6657 degrees (with a maximum of 1.312 degrees) with a 12 inch setup down to 0.1017 degrees - with a maximum error of 0.2055 degrees.
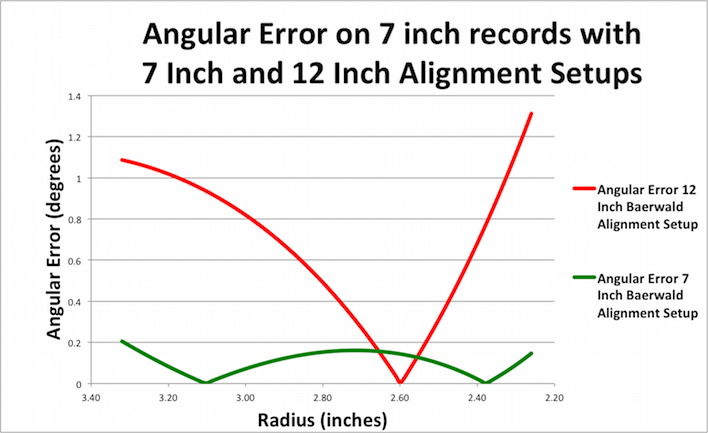
The chart of angular errors across the playing band of a 7 inch single illustrates far greater angular error between the stylus and the groove when playing with a 12 inch setup. This is partly because the inner groove of a 7 inch record is closer to the spindle - it is outside the dimensions of a 12 inch records.
Naturally, you will not want to re-align the cartridge every time you switch between 7 inch and 12 inch records. What we recommend is that you obtain an extra headshell and cartridge for your tonearm (many tonearms have standardized, interchangeable headshells) and set one up for 12 inch records, and the other for 7 inch. Or, you may also want to set up a dedicated turntable for playing 7 inch records.
It may be necessary to re-mount the tonearm slightly farther away from the platter spindle in order to get the cartridge to align correctly. The alignment tool comes with complete setup instructions and complete charts of tonearm mounting distances for every tonearm length, and for every size of record (7, 10, 12 and 16 inch).
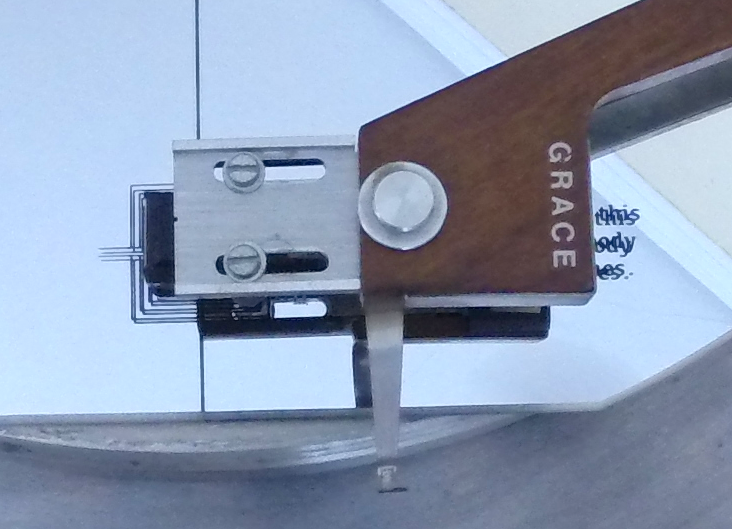
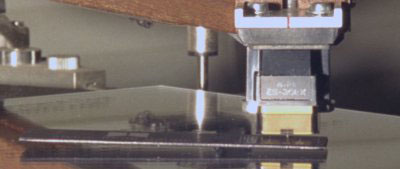
For the same mounting distance (the distance from the platter spindle to the pivot point of the tonearm), the effective length will need to be slightly longer for a 12 inch setup than for 7 inch. For example, a tonearm with a 9 inch effective length will need to be mounted 8.285 inches away from the spindle for a 12 inch setup. To align that tonearm for 7 inch records without re-mounting it, the effective length would need to be about 8.68 inches. This means that you would need to move the cartridge body 0.32 inches back from its 12-inch setup position. Also, the offset angle would change from 24.12 degrees to 17.61 degrees, meaning you would have to rotate the cartridge body about 6.5 degrees away from its original position. The photos above show the position of the cartridge mounted in a headshell with 7 inch and 12 inch setups, with the same mounting distance.
The mirrored surface makes all measurements easier and more accurate. The mirror's parallax effect allows the elimination of sighting errors, and provides better lighting, critical in making fine adjustments on small parts. The two null points on the alignment tool are surrounded by concentric squares instead of a grid, so that the user will be measuring the cartridge body's lineup against parallel lines at each edge.
Finally, the horizontal sight-line, which is to be pointed at the pivot point of the tonearm when measuring alignment in the outer grid, ensures correct overhang length on any tonearm, irrespective of its effective length. There is an inverse relationship between the effective length of the tonearm and the optimal offset angle of the headshell.
Regardless of tonearm effective length, the two null points at which the stylus should be perfectly tangent to the groove, are the same. They are optimized for 12 inch records. A properly designed and mounted tonearm will allow the cartridge to line up properly in both grids. For more information on the relationship between effective length, mounting distance and offset angle, click here.
Complete instructions are included. They cover: levelling the turntable adjusting vertical tracking angle calibrating and adjusting the tracking weight setting overhang length adjusting the tracking angle checking and adjusting azimuth
Because some turntable models (i. e. Empire, Thorens, Luxman, VPI, Systemdek, Well Tempered) have larger spindles, this alignment tool is available with either a standard or oversized spindle hole. All other brands of turntable will take the standard spindle hole. If you need an oversized spindle hole, just include a note during ebay checkout.
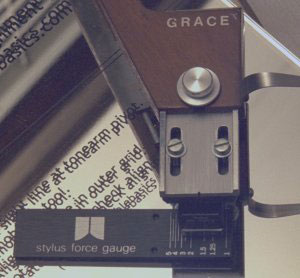 |
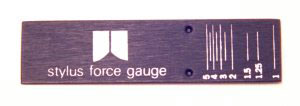
Stylus Force Gauge $15.00Shopping Cart Supports Paypal, Visa, MasterCard, and American Express Correct tracking force is not optional. Incorrect stylus force will damage your records as well as your stylus. Running the tracking force too low can be as damaging as running it too high. Always follow your cartridge manufacturer's specifications when adjusting tracking force. This simple balance-beam stylus force gauge is easy to use. Simply place the stylus on the mark indicating desired weight and adjust the tonearm counterweight until gauge balances straight and level. Ideally, this adjustment is best made with the stylus sitting at the same level as it would during playback. Either place the force gauge directly on the platter pad, or remove the platter pad and rest the force gauge on the mirrored alignment tool. The mirror will help determine when the gauge is perfectly level. |
 |  |
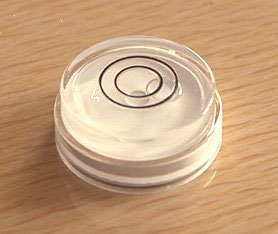 |
Bubble Levels $5.00Shopping Cart Supports Paypal, Visa, MasterCard, and American Express Ensuring that your turntable platter is perfectly level is critical to obtaining correct tracking performance. This simple, accurate bubble level is perfect for the job. Remove the platter pad and place the level on the bare metal platter with the motor off. Place shims under the foundation as necessary to make the bubble appear in the center of the printed circles. Observe the motion of the bubble to test for wobble in the foundation. Do whatever you can to make the foundation heavy and stable, to prevent the transmission of feedback to the turntable. Quiet foundations allow enhanced detail and dynamic range in the audio signal. |