Turntable Basics Advice Page
Welcome to the Turntable Basics Advice Page. The purpose of this page is to give a basic introduction to the issues involved in turntable performance. Understanding the sources of feedback, distortion and tracking errors will help you to improve your own stereo system. Many of the strategies available to you are very inexpensive to execute.
Getting the most out of your turntable.
Correct cartridge alignment.
The cartridge needs to be installed onto the headshell correctly, with the needle sitting at a perfect tangent to the record grooves. Do not assume that your cartridge was aligned correctly when you obtained it, even if it was new from the factory. A cartridge alignment tool is required to set up the cartridge and tonearm correctly. The angular alignment of the needle with respect to the groove will actually change slightly as the tonearm goes across the playing band of the record, and to minimize angular error at every point, it needs to be perfect at two distances. Those ideal distances, called null points, are a function of the record diameter, or, more specifically, the radius of the beginning and end of the playing band. The needle also needs to be a certain distance from the pivot point of the tonearm, which is a function of the mounting distance, or the distance from the center of the platter spindle to the pivot point of the tonearm. Our alignment tool has a horizontal sight line that will ensure correct effective length when it is pointed at the tonearm's pivot point, no matter what the mounting distance may be.
Optimal cartridge alignment is a function of record size. If you play a lot of 7 inch singles, 10 inch EPs or 78 RPM records, then you may want to use a separate turntable, or an extra headshell with a cartridge that's custom-aligned for that record size. For a tonearm mounted a certain distance from the platter spindle, the effective length and offset angle will be different when optimized for 7 inch or 10 inch records. If you are playing 16 inch transcription records, then you will need a player with 16-2/3 rpm speed available, and a longer tonearm. Special alignment tools for 7 inch, 10 inch and 16 inch records are in development and will be ready to ship very soon.
 Tracking Force Adjustment.
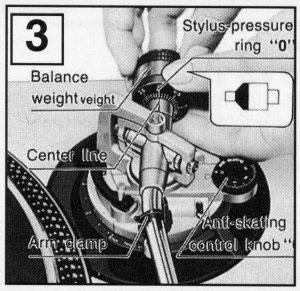
Be sure your tonearm has adjustable tracking weight. Arms that lack an adjustable counterweight are built only for a single model of cartridge and may cause big tracking problems. To adjust tracking weight, first calibrate the mass to zero. Dial the counterweight away from the pivot point until the tonearm floats perfectly level, with the stylus at the level of the record's playing surface. Hold the counterweight still and set the dial at zero. Then, spin the counterweight in until the dial reads the mass specified by the cartridge manufacturer. Normal audiophile cartridges typically track at 1.0 to 1.5 grams; club DJ cartridges can range from 3 to 5 grams; and 78 rpm styli should be weighted at 3 grams. But these are general guidelines. Follow the manufacturer's specification. Running the tracking weight too light can be as bad, or worse, than running it too heavy. If your tonearm does not have a dial indicator on the counterweight, then you will need a stylus force gauge to help you set the tracking force correctly. We have these in stock.
 Vertical Tracking Angle Adjustment.
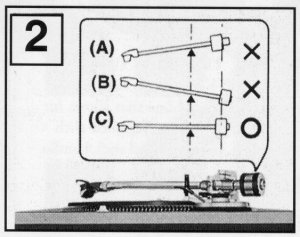
Vertical Tracking Angle, or VTA, is the angle between the cantilever and the horizontal plane. Cartridges are set up for this angle to be correct if the top surface of the cartridge body is parallel to the record surface. Maintaining the correct angle is critical to achieving proper tracking performance. The easiest way to ensure correct vertical tracking angle is to get the tonearm wand parallel to the record, and the mirrored surface of our alignment tool makes this easy to check. Most good tonearms have some way of adjusting the height of the mounting base, particularly if it is an aftermarket tonearm. If you find that the tonearm base is too high and it's not adjustable, then you can correct the angle by adding shims between the cartridge and headshell.
Azimuth.
The cartridge body should not be pitched to the left or right. This is mainly an issue for mono-pivot tonearms, as arms with vertical and horizontal bearings at the pivot point usually don't have adjustable azimuth. Azimuth adjustment ensures that the stylus cantilever is perpendicular to the record's surface, which is important for correct tracking.
Level.
The turntable needs to sit perfectly level in order to track properly. The best way to check this is to place a circular bubble level on the platter's bare matal surface with the platter pad removed. We have bubble levels in stock for this purpose.
Anti-Skate Mechanism.
The stylus has a tendency to skate toward the center of the record, caused by a vector force due to the offset angle of the headshell and friction in the grooves. The amount of skating differs across the record surface and varies depending upon the intensity of the groove modulation and even the vinyl formulation. This force can cause an imbalance in signal strength between the right and left channels, as well as make groove-skipping more likely.
Anti-skate mechanisms come in two styles: Gravity-driven, which have a visible assembly of string, pulley and weight that produce a torque on the tonearm shaft that pulls it back to the outside of the record; and those that present only an adjustment knob next to the tonearm base.
Gravity-driven anti-skate mechanisms can be adjusted by moving the string back and forth along the yoke that runs parallel along the top of the tonearm. Placing the string further out from the tonearm pivot point increases the anti-skating force; placing it closer to the pivot reduces the effective torque and hence the anti-skating force.
Friction type anti-skate mechanisms. The adjustment knob may have numbers, which usually are supposed to be set to match the tracking force, while others have symbols for the type of stylus you're using. There will be a circle for spherical needles, and an oval for elliptical needles. Some tonearms have no anti-skate mechanism at all. My Grace 714 tonearm has no anti-skate, and I have to keep the azimuth balance knob leaning toward the right channel to compensate.
The heart of the matter: how to properly adjust the anti-skate mechanism? You want to adjust it by experience and testing. If your tonearm tends to skip forward, then you want to set the anti-skate force to a higher level. If it skips backward, or repeats, then you want less anti-skating force. You can also calibrate the anti-skate mechanism in a more laboratory-style fashion, using a test record or a record with a blank side. Some test records have blank bands at 3.5 inches and inward to the inner groove, to calibrate the anti-skate mechanism. The mass of the weight, or the notch on the bar where you attach the weighted string, or the adjustable dial, should be modulated until the tonearm sits still while riding on this blank band, at about 3.4 inches from the center, instead of floating toward the inside or outside. If you don't have a test record with this feature, then use a record with a blank side. One LP that is currently available that has a blank fourth side is Adore by the Smashing Pumpkins.
 Headshell: universal, proprietary, half-inch and p-mount.
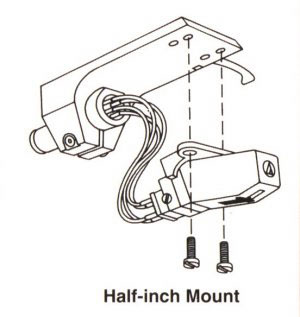
The great majority of tonearms accept cartridges with a standard half-inch mount. In most cases, the headshell allows some adjustability in cartridge mounting, to allow correct alignment for a wide variety of cartridge designs. A few tonearms are completely proprietary and only the manufacturer's cartridge and stylus will ever fit. Bang and Olufsen tables come to mind in this respect. Other tables, usually the cheaper Japanese tables, have p-mount tonearm-cartridge combinations. The major problem with p-mount systems is that cartridge alignment is not adjustable. If the manufacturer did not match the tonearm's mounting distance to its effective length, then you will have problame with inaccurate tracking angle, which will cause poor quality sound and record damage.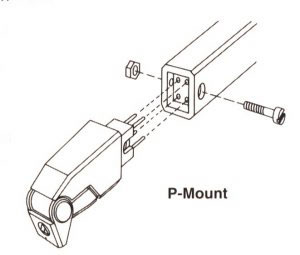
The reason why you may prefer tonearms with H-4 headshells is that replacements and extras are easily obtained. You may want to have extra headshells for running mono cartridges, 78 RPM cartridges, or other stereo cartridges that you have custom-aligned for 7 inch or 10 inch records.
Cueing Mechanism.
Getting the cueing mechanism to drop the cartridge at the correct speed is important in order to prevent damage to your cartridge and records. Correctly set up, the needle should drop slowly enough that no thump is heard through the speakers. Most cueing mechanisms have a rotating cam at the bottom of a cylinder that pushes the piston upwards. A small amount of a highly viscous silicone fluid also sits in the cylinder, and the upward motion of the piston pushes the silicone with it, coating the cylinder walls. When the cueing lever is brought to the resting position, the cam rotates and stops forcing the piston upward. Gravity brings it back down, but the silicone in the cylinder slows its motion. Over time, this silicone fluid can degrade and leak out. Turntablebasics offers replacement silicone fluid for this purpose. Different manufacturers used fluid of different viscosities; the fluid available is 100,000 cst (centistokes). It is in the correct range for this application, but viscosity is only one factor in the equation. The other major factor is the clearance between the piston and the cylinder wall inside the cueing mechanism. After cleaning residue out of the mechanism with a Q-tip, add the new silicone fluid a little bit at a time, reassemble and test. Getting the quantity right is important. Don't just fill it all the way. That will impede motion completely. If no amount of silicone fluid will allow the needle to drop slowly enough, then consider adjusting the piston/cylinder clearance by applying a layer of clear nail polish to the piston. Before using nail polish or any other chemicals, be sure that the cartridge is not in the room, and that you have adequate ventilation. Many cartridges have an elastomer at the pivot of the cantilever that can be degraded by the presence of aromatic hydrocarbons. On a related note, never use steel wool in the same room or house. Small bits of iron dust get into the air and accumulate on the cartridge's coils.
Platter Speed.
You want to get the platter speed correct, and also very stable. Obviously, you want to get the speed correct for the sake of obtaining correct pitch from the music. But it is also important to get the speed very stable, to remove any signs of wow and flutter, to improve the quality of the sound, most notably an effect called soundstaging. With a belt drive turntable, using a new belt will give better friction and less slippage, for more stable speed. On an idler wheel drive turntable, having the idler wheel rebuilt will also yield better friction and speed stability, and also reduce rumble in the platter. With direct drive turntables, cleaning the control potentiometer with contact cleaner will help reduce the instability caused by dirty contacts.
"Elegance."
In industrial design generally, elegance is an important goal. Simplicity and leanness of design contribute to a final product that is dedicated to one job and does it correctly and reliably. Products that try to do more than one job never do any of them well. Extraneous design elements distract from the primary mission. Insisting on simplicity does not justify cheap construction, though. When choosing a turntable or tonearm, watch out for gimmicks. Turntables designed to be automated, or lightweight, or compact, will carry features that introduce noise or mechanical chatter. Tables that are not hefty will transmit large amounts of mechanical feedback (harmonic vibrations) from the air and the floor.
Monopivot vs Bearings.
Most tonearms have two sets of bearings, one allowing it to swing radially across the playing surface of the record, and the other allowing it to pivot up and down. To avoid introducing noise, these bearings must operate with perfect smoothness. There should be no play between wand and base, and the bearing must introduce no friction and never bind up when moving. Imperfectly adjusted or worn bearings can introduce substantial chatter and impede proper tracking of the stylus in the groove. Unless you are a jeweler or watchmaker, do not attempt to service or disassemble the bearings yourself. The alternative design is monopivot. The whole tonearm wand and counterweight rest on a knife edge or pinpoint. Azimuth adjustment is achieved by moving a weight in or out from the left side. However, monopivot arms are subject to pitch and yaw, giving balance instability. If the azimuth adjustment is not correct, playback problems will occur.
Effective Length and Offset Angle.
Effective length is the distance between the pivot point of the tonearm and the stylus. If you draw a direct line between these points, and another line tangent to the record groove that intersects the stylus, the angle between these lines is the offset angle. Tonearms with longer effective lengths will produce better alignment across the playing band, because it is thrown off less at the beginning and end of the band. Alignment is only perfect at the two null points, which are 2.60 and 4.76 inches from the center of the record. The offset angle of a properly designed tonearm will depend upon the effective length. Longer arms will have smaller offset angles, and shorter arms will have a larger offset angle. Neither of these values can be adjusted by the consumer.
Platter.
Seek a turntable with a nice heavy platter. Keeping the record isolated from external vibrations is critical to achieving detailed playback, clean sound and full dynamic range. A real tweaker would apply a coat of silicone glue from a caulk gun to the underside of the platter to hold down vibrations. Hopefully this will not increase the mass and inertial moment sufficiently to overwhelm the motor and affect speed. The platter will also have to be rebalanced after this procedure. Any modifications you make to your own turntable are made at your own risk, of course.
Deckplate.
The same considerations for holding down vibrations in the platter also hold true for the deckplate, also called the plinth. Providing a stable and acoustically dead foundation for the tonearm will yield great rewards in undisturbed playback. This is, after all, a mechanical reading system. Keeping the playback system perfectly isolated from external vibrations, making it acoustically dead, is the holy grail.
Installing aftermarket Tonearms.
Most high-end turntables have modular tonearms that can be replaced. Custom-mounting the new arm should be done with a template that comes from the tonearm manufacturer. The distance between the spindle and the pivot point of the tonearm is a function of the effective length of the tonearm. Click here for more information on tonearm mounting specifications. When I installed the Grace 714 to my Empire 208, I had no template to work from and had to reverse-engineer the process using my alignment tool. I mounted the cartridge in the center of its travel in the headshell and got the cartridge body square with the headshell. Then, I balanced the tonearm to zero grams tracking force, so that it would float perfectly level. After setting the mounting shaft in the base so that the bottoms were flush, I moved the base around on the plinth, adjusting its position until I found the spot where the alignment tool's sight line pointed directly at the pivot point of the tonearm and the stylus landed correctly in the outer aligning grid. Of course the stylus was sitting an inch or so above the alignment tool during this part of the process, which made the mirrored surface of the tool indispensable.
THE HOLY GRAIL
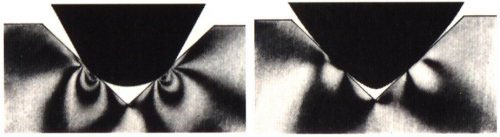
of setting up and tweaking your turntable is to make it ACOUSTICALLY DEAD. It is a mechanical pickup system. The job of the cartridge is to translate vibrations into sound. You want it to read only the vibrations caused by the stylus getting moved around by the groove. You don't want to pick up the vibrations in the record itself, or the platter, or the tonearm, or the plinth (deckplate) that it's mounted on. Waves interfere with each other. Waves can cancel each other out. For that reason, when your turntable is exposed to and transmits vibrations from the floor, you'll get more than just feedback and muddiness. Fine details also get washed out.
When you have finished a major upgrade or even a small tweak, you'll be able to play records that you're already familiar with, and realize that you're hearing more individual notes than before. Additionally, bass notes will be much tighter and more clean. Mid-range and high notes become much more distinct. When you've isolated and improved your system to the point that it's really sensitive, you'll hear that each note has a beginning, a middle and an end. And, that's when digital copies of the same music start to sound really bad by comparison.
Choosing a cartridge:
If you need to replace the cartridge on your turntable, it is not necessary to get the same brand or model as the original. Turntables come new with (relatively cheap) stereo, Moving-Magnet cartridges. All Moving Magnet cartridges are electrically interchangeable, which means that they have the same requirements for resistive load (47,000 Ohms) and capacitive load. The output strength will vary from 3.5 millivolts to 5.0 millivolts, but this doesn't present a compatibility issue. Higher output cartridges will simply be a bit louder, but the higher signal strength will not blow out or damage the preamplifier circuit.
Moving Coil Cartridges.
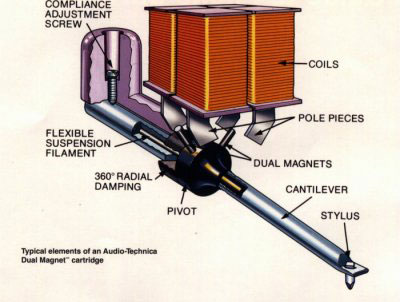
Any Moving Coil cartridge should be marked MC on its body. Instead of having small (but relatively heavy) magnets on the far end of the cantilever, which give Moving Magnet cartridges their name, Moving Coil cartridges have small (and very lightweight) copper coils at the end of the cantilever, which move it between two poles of a magnet. Because the coils on the cantilever are so much lighter, Moving Coil cartridges are much more compliant (sensitive) and will create a more highly detailed signal than Moving Coil cartridges can. They are also much more expensive. Their motion induces a current in the coil, which is much smaller than the current induced in the stationary coils of a Moving Magnet cartridge. As a result, they will require an additional stage of amplification before the standard phono-stage preamp circuit. Separate, or outboard, gain-stage amplifiers are available for this purpose, or, you can buy a special (expensive) preamplifier that has this gain stage circuit built in. Moving Coil cartridges also differ from each other in their requirements for capacitive load and resistive load. Preamplifiers that can handle Moving Coil cartridges will have jumpers on the back with which you can vary the resistive load of the amplifier circuit upon the cartridge coils, as well as a set of jumpers to adjust the capacitive load. Because the tonearm cable will also present a capacitive load, the user will need to know the capacitive load of the cable and subtract that from the load they set the preamplifer to. Because of the limits placed upon the compliance of a Moving Magnet cartridge by the mass of the magnets, it makes little sense to spend more than, say, $300 on a new Moving Magnet cartridge. If you have that kind of budget, you are better off investing in a Moving Coil cartridge and preamplifier.
 Stylus Types
When choosing a new cartridge, especially a less-expensive one, it's important to know which types of stylus work best. The cheapest type is Spherical, and is to be avoided. These diamond needles are larger, and because of their shape, they will meet the groove wall along a much smaller surface area. Elliptical diamond styli are acceptable, but you're better off with a smaller sized one, i. e. 0.3 mil by 0.7 mil is better than 0.4 mil by 0.7 mil. Smaller styli fit more accurately into the groove and match the contours of the groove wall better. The goal is to have the stylus meet the groove wall over the largest amount of surface area possible. When this is true, the pressures exerted by the groove on the stylus as it moves the stylus around are less intense, and produce shock waves of lower intensity. It is these shock waves that cause physical disruption to the groove wall itself, and also produce resonances in the record. If you were to play a record with the amplifiers off, you will still be able to hear some discernible music from the record itself. It is these shock waves that produce the sound, and the loudness of that sound will get lower as the quality of contact between stylus and groove improves. Premium styli are often called Linear Contact, Micro Line, etc. These are much more accurately cut and are designed to have the exact same shape as the cutting stylus that made the original master disc.
 Cantilever
The cantilever is the larger, more visible piece that connects the stylus tip to the magnetic coils in the cartridge. It is part of the replaceable stylus assembly. To work optimally, the cantilever must be very stiff, so that it accurately transmits the mechanical signal, and also very light, so that it does not impede the rapid acceleration of the stylus assembly back and forth. Making it both stiff and light requires the use of exotic materials and nano-assembly procedures. The composition and construction of the cantilever have the greatest impact on the frequency response range of the cartridge. Hence, the really good ones are expensive. It's not just the stylus that matters.
Headshell Wire Color Codes.
The pins on the back of your cartridge will be marked for matching with the correct wire. Usually, these pins are arranged in a square configuration, with markings of S (signal) on the top and G (ground) on the bottom, and then L (left) on one side, and R (right) on the other. One of the G (ground) pins may also have a visible metal piece attached to it that you don't see on the other three, this piece is for grounding the metal body of the cartridge. Each corner pin's identity is determined by the markings on the two sides that meet at that corner.
Headshell wire color codes:
Red=Right, Signal (also called Non-Inverted, or positive)
Green=Right, Ground (Inverted, or negative)
White=Left, Signal (Non-Inverted, or positive)
Blue=Left, Ground (Inverted, or negative).
You can check the accuracy of your connections by using a voltmeter to check for continuity between the cartridge pins, or headshell wire connectors, and the RCA connectors on the other end of the tonearm cable. The cable end colored Red will be the Right channel. The Left channel cable end will be colored Black, or White, but not Red. The inside pin of the RCA connector carries the Hot Signal (positive, or non-inverted) while the outer RCA connector will carry the Ground (Negative, or Inverted) signal. Because the output of the cartridge is an Alternating Current (AC) signal, the terms Positive and Negative are misnomers, but people and manufacturers still use these terms frequently.
Balanced Signal Preamplifiers.
Most stereo systems are single-ended, which means that one conductor carries a hot signal, while the other conductor is connected to Ground. A balanced audio system will have two parallel amplifier circuits each for the Left and Right channels. They use XLR connectors (like you would see on a studio microphone) instead of RCA. XLR connectors have three pins, one for non-inverted and another for inverted, and a third connector for the ground connection. The ground connection is for shunting the conductive shield in the cable housing, to get rid of any induced signals from RF (Radio Frequency) or 60 Hz motor hum, and keep them from adding interference to the audio signal. The grounded shield in the cable will also connect the chassis of the preamplifier to the chassis of the turntable, the tonearm, and the cartridge body.
Choosing a Turntable.
Direct Drive vs. Belt Drive.
Direct drive turntables have the advantage of a quick-start system. You can turn the motor off or hold the platter still with your left hand, put the needle down where you want and quickly get back up to speed. Putting the needle down with the platter sitting still allows greater accuracy and confidence, and minimizes damage to the record and needle, as well as the harsh noise associated with unstable needle drop. However, to allow quick startup, most direct drive turntables have unusually light platters, allowing greater resonant feedback. They can also transmit more noise from the motor and bearing. Speed can be more unstable, causing greater wow and flutter. A notable exception is the Technics/Panasonic SL1100 and 1200 series turntables. They are particularly heavy, stable and quiet, as direct drive tables go. The SL1200 series is the club DJ's number one choice, and is also perfectly acceptable for audiophile playback (with an "audiophile" cartridge, not a club DJ cartridge).
Belt drive turntables offer greater speed stability. A motor that runs at a slow speed is difficult to control. Direct drive turntables continually sense the speed of the platter and adjust the strength of the electromagnets' pulses to compensate for variables, but even at a regular speed of 33-1/3 RPMs, maintaining very smooth, constant angular velocity is next to impossible. Line voltages can vary, particularly when the compressors in refrigerators and air conditioners kick in. A belt drive turntable will use a higher speed motor and then gear down its speed dramatically, which diminishes the impact of any speed variations in the motor. The application of force on the platter is more constant, instead of pulsing, and depends less on the flywheel effect of the platter to maintain constant speed. Good speed control doesn't only affect the pitch of the sound, or wow and flutter; more subtle effects such as sound-staging are also greatly enhanced.
On the other hand, belt drive turntables force users to put the needle down with the platter spinning. This requires patience and skill, or a cueing mechanism that drops smoothly. Turntable Basics offers super-viscous silicone fluid for this purpose. Belt drive tables also allow greater platter mass and speed stability. Disadvantages include the propensity of the belt to stretch and harden over the years, hindering both tension and grip. Happily, turntablebasics offers a wide selection of new turntable belts.
Manual, Auto-return, and Fully Automatic Turntables.
Audiophiles prefer fully manual tonearms because their motion is undisturbed by extraneous mechanisms. Fully automatic turntables are best avoided. Auto-return mechanisms can be minimally invasive, using a trigger that only touches the tonearm shaft in the final half-inch or so of its travel. Still, I have seen a few used records out there with wear on the inner portion of the playing band that is visibly harsh.
Building record shelves.
Records are heavy. It's best to place your record shelf against a load bearing wall, such as an outside wall of the building or an interior wall that is supported from below, all the way to the building foundation. Placing the shelf in the middle of a floor span can weaken the floor structure. Ideally, if you know which way the floor joists run, then you should place the shelf perpendicular to the joists, so that it is supported by multiple joists instead of only one.
You'll want shelves that are thick and short. If they go too far a distance without support, they will bow. They should also be held to the vertical support by a divot that it slides into, or a metal bracket from below. The little clips that stick into holes in the sides won't be strong enough.
If you want to go with longer shelves, then you'll want to reinforce them from below by screwing a heavy gauge L-iron onto the bottom. Screw it onto the middle or back third, with the vertical face sticking forward and cover it with black tape to hide it. With a 14 inch space between shelves, you'll have enough room for the steel L brackets and the records, and the shelves will stay straight.
Rather than hunt around the retail shops and suffer through cheap solutions, try calling a woodworker or furniture shop right off the bat and tell them what you're looking for.
Build for growth; there are lots of good used records out there!
Collecting used records.
If you live in a large city, check the yellow pages and get to know all the used record stores in town. Different stores will put different price tags on the same recordings, based on how well they sell to their primary customer base, and how often they turn up used. Each store will likely have several sections: brand new records, such as new releases, new reissues of old titles, and new old stock. The number of titles still in print will surprise you. In used records, you will find new arrivals, used records organized by artist, and, the discount pile.
To save money, your best strategy is to look at the discount pile in every store before moving on to the general used record stacks or the new releases. You will be surprised at how many records you'll find for less than a dollar at one store that costs five dollars or more somewhere else.
Seasoned collectors will always hit the used - new arrivals section as soon as they walk in the door. Today's new arrivals will contain many gems that nobody has gotten to yet, and new arrivals from earlier in the week will be more picked over. Everybody's tastes are different, and lots of collectors already have titles that you're still looking for.
Most shops will inspect used records as people bring them in, and reject copies that appear badly worn or dirty. Stores will also grade records for condition, and charge more for records with less damage. Any store should have a listening station to let you check condition for yourself. You can also make your own visual inspection.
When looking at a record, you want to look for fingerprints and engrained dust. Fingerprints and dirt can be cleaned off, of course, but actual damage is permanent. Check the condition of the vinyl surface across the entire playing band, paying particular attention to the beginning and the end of the side.
Damage caused by misaligned or damaged needles will often show up visually as a subtle difference in surface appearance at the beginning and end of the playing band, because cartridge alignment is least accurate at the extremes. Record players with poorly designed or adjusted auto-return mechanisms will also cause chatter, or interference with the travel of the tonearm, as the arm approaches the end of the playing band and begins to touch the auto-return activating device but hasn't yet activated it.
Of course, if you take a new used record home and find that it's so noisy that it distracts you from enjoying the music, most record stores will take the record back within a week for exchange value. Keep the receipt handy until you know you're satisfied with your purchases.
Buying used records online.
If you have a particular title in mind and cannot find it locally, or if you live a great distance from good record stores, then shopping online is a very good option. Shipping costs can add up, but records qualify for media rates when shipping by USPS, which is less expensive than other packages of the same weight. Once you have found a record that you must have, check out which other titles the same seller has in stock, so that you can have them shipped together at a lower cost. There is one major consideration when mail-ordering records, and that is damage to the record jacket spine. If the record is inside the jacket, it can be shaken around slightly and the edge can cut into the middle of the jacket's spine. Always ask the seller to ship your records with the record in the sleeve, but outside of the jacket, to prevent this damage. With new records in shrink wrap, this is really not an option, but the shrink wrap does seem to hold the record pretty still within the jacket.
Removing price tags
Your new used records will also have price tags on them that you may want to remove. There are a few products out there that will remove adhesive, such as Goo Gone, but my favorite is napthalene, or lighter fluid. Ronsonol and zippo are two popular brands. To remove the label, first put a few drops of fluid onto the label, just enough to soak into the paper. After a few seconds, you should be able to remove the label in one piece with a sharp knife edge or even a fingernail. A small amount of adhesive will remain; put down a few more drops of fluid to dissolve it, then wipe it up with a paper towel or napkin. When you're done, the lighter fluid should evaporate completely and not discolor the printing on the record jacket or warp the cardboard jacket material.
Of course, lighter fluid is flammable, and the fumes can be unhealthy to breathe in. So, only use it in a well ventilated area, with no open flames, or, ideally, outdoors. Use a q-tip to spread the fluid across any adhesive you want to remove, instead of letting the fluid touch your skin.
Clean your records thoroughly before playing or storing them. If they are a bit dusty but otherwise clean, then a carbon fiber record brush will suffice for daily cleaning. For truly dirty records, or newly acquired used records, a liquid cleaner will be more appropriate. We have both in stock.
Handling your records.
When playing and handling records, be sure your hands are clean, and don't leave records lying around. Try not to let your skin touch the playing surface; only touch the outer rim, the label, and the spindle hole. Fingerprints attract and retain dust. Records should only either be on the turntable platter, or in the sleeve and back in the jacket.
To remove a record from the sleeve without touching the playing band, reach your hand into the sleeve while it's bowed open, and touch your middle finger onto the spindle hole to pull the record out. The edge of the record should be up against the palm of your hand. Then set the sleeve aside and hold the record from the edges with both hands to transfer it onto or off of the turntable platter.
Putting the record back into the sleeve should also be done carefully. Hold the record in one hand with your palm at the edge and one finger on the spindle hole. If the record sleeve is thin and flexible, then use your thumb to widen the open side and slip it over the edge of the record. If the sleeve has a glue seam on the inside, be careful not to push the edge of the record into the seam.
To put the sleeved record back into the record jacket, hold one edge of the jacket up against your body and use one hand to bow it open while carefully sliding the sleeve inside.
Always store your records upright on a shelf. If they are leaned over too much, then you can scuff the printing off of the jacket while sorting through the pile. Don't put too many records onto one shelf to the point where it takes force to make an opening to pull one jacket out or put one back. Simply piling records on top of each other puts too much pressure on the records at the bottom of the pile and can damage them.
Storing records in a room that's too humid, or which can be flooded, risks water damage and mold that can destroy the original record jackets, or even leave mold deposits on the record surface. If you must store records in a basement, keep them off of the floor with a pallet, and use a dehumidifier and a fan to keep moisture levels down.
Playing records.
The biggest obstacle for beginners is placing the needle down on the record groove smoothly and with confidence. Instead of grabbing the headshell finger rest with two fingers and placing the needle down with force, use your index finger to lift the headshell rest and let gravity hold it down against your finger. As you get the headshell close to the record, place the edge of your hand on the turntable plinth to keep it steady, and then move the headshell with your index finger to get the needle onto the playing band. Having good lighting will help you place the needle accurately on the outer part of the playing band, or at the beginning of a song in the middle of the playing band. If your headshell rest is made of metal, you may want to file a notch in the edge near the end of the rest, to create a small barb, or point, that your finger can hold and control more easily from the inside.
If your tonearm has a cueing mechanism, then you can use it to drop the needle slowly onto the record surface once you have moved the needle over the starting point of the song or side you want to play. If your tonearm has an anti-skate mechanism that is gravity-driven (this system will use a monofilament string and weight to pull the tonearm back away from the inside of the record), then you may have a problem with the tonearm moving backwards once the cueing device has released it. In this case, you may want to revert to placing the needle on the record manually, and only using the cueing mechanism to pull the needle up at the end of the song or side you're listening to. If your cueing mechanism is dropping the needle more quickly than you'd like, then you can disassemble it and give it fresh silicone damping fluid, which we have in stock. It is shipped with instructions, but of course every turntable is assembled differently, so the instructions are generic and general in nature. Still, somebody at the factry had to assemble it, so it can be disassembled. We've never had a report of a cueing mechanism that is simply not serviceable.
Stereo, Mono and Re-Channeled records.
How do stereo LPs work?
Original mono records had a groove that went back and forth (left and right) and the cartridge coil would pick up that motion and make it into a magnetic signal. In a stereo LP, the groove wall has two faces which form a V at the bottom. The needle, as it follows the contours of the groove, will travel simultaneously in two directions, which are 90 degrees opposed to each other. One goes down-left to up-right and the other goes down-right to up-left. Think of it as southeast to northwest, and southwest to northeast. The two magnets on the other end of the cantilever stick off like horns, pointing up-right and up-left, and ride inside magnetic coils that are also positioned 90 degrees apart. One coil picks up motion in the up-right to down-left axis, and the other coil picks up motion in the down-right to up-left direction.
Playing mono records on a stereo cartridge.
If you have a record from the 1960s or earlier, and it isn't prominently labeled as a Stereo recording, then it is in mono. Stereo LPs were invented by Columbia in 1958. Early stereo cutting heads were primitive, and recording engineers hadn't yet mastered the intricacies of stereo mastering. Many Beatles collectors believe that the best copies of albums up through Rubber Soul were the English-made mono copies. Two other records of the era that have recently been reissued in mono are Blond on Blond by Bob Dylan and Axis: Bold As Love by The Jimi Hendrix Experience. I have both of these pressings and they sound fabulous. To make a more coherent signal from a mono record on a stereo sound system, you have two options. One is to obtain a dedicated turntable and run a mono cartridge. This cartridge should be hooked up to the Left signal input on your stereo receiver or preamp, and then set the stereo controls to play the Left signal on both speakers. The other option is to use your stereo cartridge, and set the stereo controls to play in mono, or combine both signals at the preamp and then play it on both speakers.
Playing records that have a mono signal that has been re-channeled for stereo.
On these records, popular in the 1960s, usually as reissues, the original signal was recorded onto the Left channel, and the Right channel had the same signal, with a slight delay, and equalized slightly higher. This was designed to give the illusion of a wide degree sound stage with bass and drums toward the left and higher frequencies on the right. If you play the right signal all on its own, it will just sound wrong. What you really want to do is set up the stereo to play the Left signal only, on both speakers.
Quadrophonic records.
This was an attempt, most popular in the 1970s, to make a four-channel audio system. To play them, you had to obtain a quadrophonic amplifier, or two identical stereo amplifiers, and also a quadrophonic decoders. The Left Front and Right Front signals were still encoded as linear motion, while the Left Rear and Right Rear signals were encoded as circular motion. Only a high-end cartridge with a fine needle is capable of picking up the Rear Left and Right signals, and the special decoder would translate them into coherent audio. If you play a Quadrophonic LP on a stereo system, particularly a recording that you're familiar with in straight Stereo, you will be able to tell which instruments got moved to the Rear, because they will be missing in your normal Stereo playback.
78 RPM records.
Playing and Recording 78 RPM records properly is kind of complicated. You�ll want to find a player that does 78 RPM, and the Empire 208 is a good choice for all three speeds. They were made in the early 1960s and have bulletproof motors with excellent speed stability. I would use a dedicated player for 78s separately from LPs, because the cartridge alignment is slightly different when you�re optimizing alignment for a 10 inch record instead of a 12 inch. I�m working on an alignment tool for 10 inch records for this reason.
Also, the equalization standards for 78 records are different; the RIAA equalization standard was only put into place in the 1950s, after the mono LP was invented, and before the Stereo LP came around in 1958. Through the history of 78 records, the equalization standards kept changing as the recording technology improved. Not all the record companies made changes at the same time, so there is a good deal of variation. A few companies make phono stage preamplifiers with a selector switch for the different equalization standards and a chart of makers and years. When you get these details correct, the playback will improve dramatically and the sound quality will surprise you. Running a 78 record through an LP RIAA equalization circuit makes the sound quite weird and muffled. Also, you will want a phono cartridge that is custom made for 78 RPM records, as the needle size and shape is quite different.
Making digital recordings.
For recording the signal to a digital format, the best way to go is with an outboard (separate) phono stage preamp that has an analog volume control, which you will use to set the recording level against the virtual VU meter on the computer screen, while the input level controls on the computer are set to 100 percent. You want the signal to go through a straightforward analog-to-digital converter and be otherwise un-messed with. Every new algorithm that the digital signal goes through will distort and degrade the signal further.
I have a turntable with a missing tonearm counterweight. What do I do?
I think that the best option in this case is to fabricate a new counterweight. What you�ll want to do first is figure out how much the new unit should weigh. Get some fender washers that will fit over the counterweight shaft and see how many you have to place over the end of the shaft to get the tonearm to balance, and then weigh them. Then, find a piece of polyethylene tubing that will fit snugly over the counterweight shaft. You way have to cut the tubing along its length to get it to fit over the nub that originally guided the counterweight�s spiral (helical) motion (if it had a dial indicator originally). Finally, get a piece of brass rod, maybe 1-1/2 inches in diameter, and drill out the center to fit over the poly tubing. Brass is very easy to drill or machine. A two inch long piece of 1-1/2 inch diameter brass rod will weigh 1.08 pounds and costs $25 from discountsteel.com. Or, you can find a scrap yard or surplus shop and see what they have. You can set the tracking force with our stylus force gauge, and make any final adjustments to the tracking force by moving the counterweight in or out, or by removing weight from it with a sanding disk.
A machine shop will also probably have some brass rod in stock and can definitely do the drilling for you. The hard part is centering the hole, but it�s okay if the hole is off-center; just make sure the heavy end points down. If you have a monopivot tonearm, then having the hole off-center will confer an advantage: it will make the azimuth more stable.
Magnetics
Load and Impedance
Capacitive Load
Turntable Setup.
Foundation
Setting alignment
Adjusting azimuth
Platter Pad
Clamp
Wiring.
Short Circuit Path
Cable Properties:
Purity
>Grain Count
Strand Diameter
Weave
Dielectric
Capacative Load
RF Interference
Single-Ended vs Balanced Cables
Connectors
Contact pressure
Oxygen-free junction
Special Applications:
Cut and Scratch vs Audiophile
Preparing a turntable for moving and storage
Setting up an equalizer
Next topic